API & Webhooks
Generate API keys and configure webhooks to integrate billing with your systems.
Generate an API key
Create and manage API keys and their access scopes.
- 1
Open Key Management
Settings → Webhooks & Key Management → API Keys. Every key for your organization is listed with its name, key and creation date. - 2
Click + New Key
Enter a Name (e.g. API Monitoring Key) and click Create Key. - 3
Copy the key
Make sure to copy the key — use Copy, or show/hide to check it. - 4
Choose its scopes
A new key starts as “Not Scoped”. Click Edit next to Scope, tick the APIs the key may use — grouped as Accounts, Products, Customers, Invoices, Payments, Sales Email, Pricing, Coupons and Subscriptions — and click Save. Then click Finish. - 5
Hand the key to your developer
They also need your organization (tenant) name. The developer guide explains how to use both.
Keys don't expire. Create a separate key for each integration and grant each one only what it needs.
Manage a key
Click a key in the list to copy it, rename it, or change its scope. Revoke switches the key off immediately.
Set up a webhook
Get your system notified when something happens.
A webhook is a URL of yours that QuickBill calls when something happens on your account.
- 1
Open Webhooks
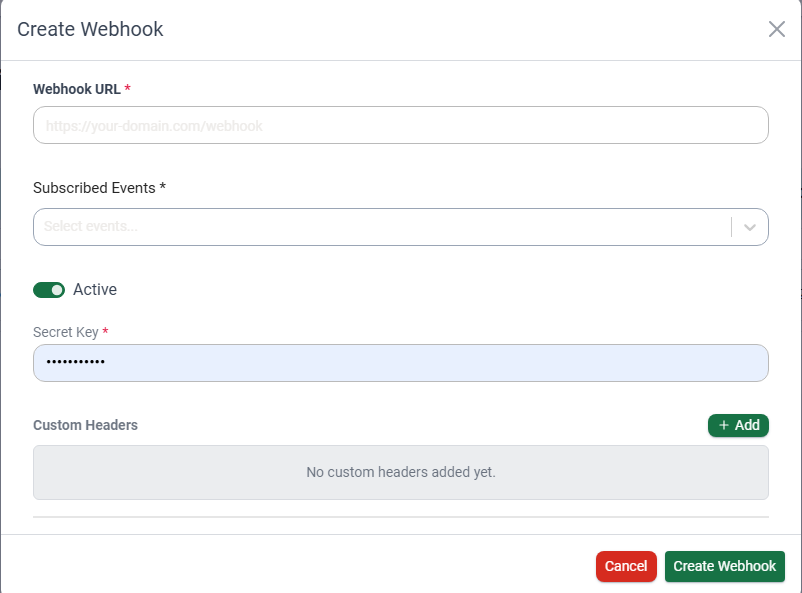
Settings → Webhooks & Key Management → Webhooks, then click + Create Webhook. - 2
Fill in the form
Field Required What it is Webhook URL Yes The address we call. It has to be reachable from the internet. Subscribed Events Yes Which events you want to be told about. Active — On by default. Turn it off to stop the calls without deleting the webhook. Secret Key Yes A value you choose. It is sent with every call so your system can tell the call came from us. It can't be changed after the webhook is created. Custom Headers No Any extra headers you want sent along. - 3
Click Create Webhook
From now on we call your URL for each subscribed event.
Events
| Event | Sent when |
|---|---|
| Subscription created | A subscription is created. |
| Subscription updated | A subscription changes plan. |
| Subscription cancelled | A subscription is cancelled. |
Check deliveries
The Webhooks list shows each endpoint's status, events and Last Triggered At. Click Logs on a webhook to see every delivery — the event, status (success, failed or pending), response code and time. For a failed delivery the time shown is the next retry.
From the list you can also View, Edit or Delete a webhook. Once deleted, your endpoint stops receiving events.
Developer documentation
For the people building your integration.
| Page | What's there |
|---|---|
| Developer | What you can build with the QuickBill API. |
| Getting Started | Authentication, webhooks, online payments and the base URL. |
| API Information Hub | How products, customers, invoices, payments and subscriptions fit together. |
| API Docs | Every endpoint with its request fields, examples and responses. |